Build Your First EKS Cluster with Terraform
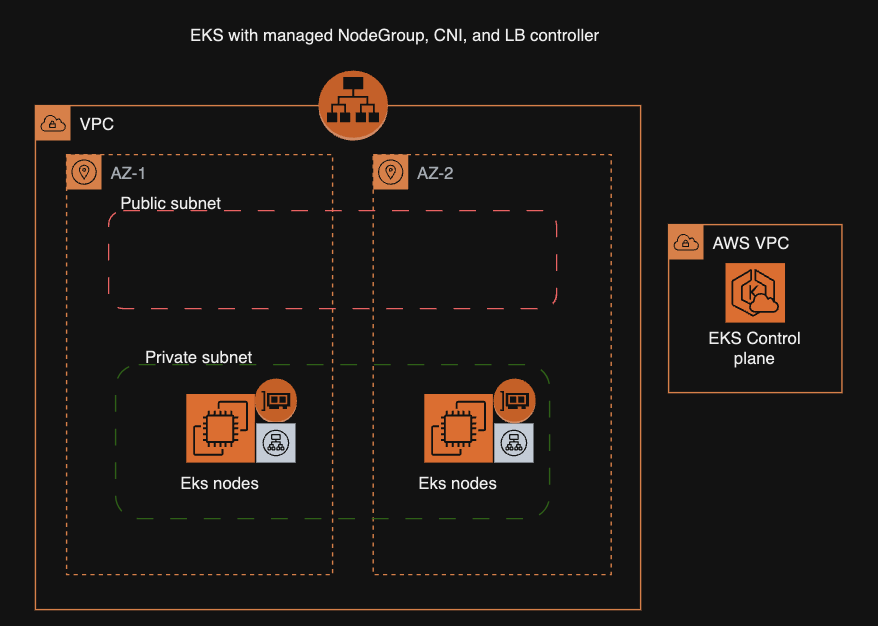
Building an Amazon EKS cluster from scratch can feel daunting due to the numerous prerequisites, networking requirements, and add-ons involved.
This guide walks through every step required to spin up a fully functional EKS cluster using official Terraform modules, including VPC setup, managed node groups, VPC CNI prefix delegation, and the AWS Load Balancer Controller.
📁 Source Code: aws-eks-terraform / EKS-Cluster-ALB
📺 Video Tutorial
Step 1. Setting Up the VPC
When configuring a VPC for EKS, you must apply specific tags so Kubernetes and the AWS Load Balancer Controller know where to provision internal and external load balancers:
- Public subnets:
"kubernetes.io/role/elb" = "1" - Private subnets:
"kubernetes.io/role/internal-elb" = "1"
vpc.tf
module "vpc" {
  source  = "terraform-aws-modules/vpc/aws"
  version = "5.13.0"
  name    = "eks-demo-vpc"
  cidr    = "10.0.0.0/16"

  enable_dns_hostnames = true
  enable_dns_support   = true
  azs                  = ["eu-west-1a", "eu-west-1b"]
  private_subnets      = ["10.0.1.0/24", "10.0.2.0/24"]
  public_subnets       = ["10.0.101.0/24", "10.0.102.0/24"]

  enable_nat_gateway   = true # Required for private worker nodes to access external resources
  single_nat_gateway   = true

  public_subnet_tags = {
    "kubernetes.io/role/elb" = "1" # Tag for external Application / Network Load Balancers
    "subnet_type"            = "public"
  }

  private_subnet_tags = {
    "kubernetes.io/role/internal-elb" = "1" # Tag for internal Load Balancers
    "subnet_type"                     = "private"
  }
}
In this configuration, public subnets have an Internet Gateway attached, while private subnets route outbound traffic through a NAT Gateway so nodes can pull container images, connect to package repositories, and contact AWS API endpoints securely.
Step 2. Provision the EKS Cluster
The following Terraform module provisions the EKS cluster in the private subnets with a Managed Node Group using cost-effective Spot instances and container-optimized Bottlerocket OS.
eks.tf
module "eks" {
  source  = "terraform-aws-modules/eks/aws"
  version = "20.24.0"

  cluster_name    = "eks-demo"
  cluster_version = "1.31"

  cluster_endpoint_public_access           = true
  enable_irsa                              = true
  vpc_id                                   = module.vpc.vpc_id
  subnet_ids                               = module.vpc.private_subnets
  control_plane_subnet_ids                 = module.vpc.private_subnets
  authentication_mode                      = "API"
  enable_cluster_creator_admin_permissions = true

  eks_managed_node_groups = {
    eks_nodegroup_1 = {
      ami_type       = "BOTTLEROCKET_x86_64"
      min_size       = 1
      max_size       = 3
      desired_size   = 2
      instance_types = ["m7i.large", "m6i.large", "m5.large"]
      capacity_type  = "SPOT"
    }
  }
}
Key Configuration Highlights
cluster_endpoint_public_access: Makes the cluster API endpoint reachable from authorized networks.authentication_mode = "API": Uses modern AWS EKS Access Entries instead of the legacyaws-authConfigMap.enable_cluster_creator_admin_permissions: Automatically grants cluster-admin permissions to the IAM identity running Terraform.BOTTLEROCKET_x86_64: Uses AWS Bottlerocket OS, purpose-built for hosting containers with fast boot times and enhanced security.
Step 3. Configure VPC-CNI with Prefix Delegation
Without prefix delegation, the number of pods a worker node can run is limited by the number of ENIs and secondary IPv4 addresses supported by that EC2 instance type. Enabling prefix delegation provides /28 IP prefixes (16 IPs per slot), easily supporting high-density workloads.
cni.tf
resource "aws_eks_addon" "vpc_cni" {
  cluster_name                = module.eks.cluster_name
  addon_name                  = "vpc-cni"
  addon_version               = "v1.19.0-eksbuild.1"
  resolve_conflicts_on_create = "OVERWRITE"
  resolve_conflicts_on_update = "OVERWRITE"

  configuration_values = jsonencode({
    env = {
      ENABLE_PREFIX_DELEGATION          = "true" # Required for high pod density and IP target mode
      WARM_PREFIX_TARGET                = "1"
      POD_SECURITY_GROUP_ENFORCING_MODE = "standard"
      ENABLE_POD_ENI                    = "true"
    }
    enableNetworkPolicy = "true"
  })
}
Step 4. Install AWS Load Balancer Controller
The AWS Load Balancer Controller provisions Application Load Balancers (ALBs) and Network Load Balancers (NLBs) dynamically. By default, it registers pods with target-type: ip, routing traffic directly to pod IPs and ports rather than relying on NodePort hops.
loadbalancer-controller.tf
resource "helm_release" "aws_load_balancer_controller" {
  name       = "aws-load-balancer-controller"
  namespace  = "kube-system"
  repository = "https://aws.github.io/eks-charts"
  chart      = "aws-load-balancer-controller"
  version    = "1.10.0"

  set {
    name  = "clusterName"
    value = module.eks.cluster_name
  }
  set {
    name  = "defaultTargetType"
    value = "ip"
  }
  set {
    name  = "serviceAccount.create"
    value = "true"
  }
  set {
    name  = "serviceAccount.name"
    value = "aws-load-balancer-controller"
  }
  set {
    name  = "serviceAccount.annotations.eks\\.amazonaws\\.com/role-arn"
    value = aws_iam_role.aws_load_balancer_controller.arn
  }

  depends_on = [module.eks]
}
Step 5. Connect and Verify Cluster Access
Once Terraform finishes applying, update your local kubeconfig and verify cluster connectivity: